FAQs
File Preparation
To ensure that you receive a more optimal print, please make sure you always follow the set up guides provided for each product. By following these guides, your artwork will be designed to improve the quality of your job. When designing your artwork, if you use our guides as a layer, please ensure that you delete it before you save the final artwork.
If you are unsure if you've setup your artwork according to the guides, we recommend you send a support ticket to request a file review BEFORE uploading and ordering. That way you can be sure the job will proceed without any file rejection issues. Completed job issues that resulted from not following our guides will not be reprinted.
In order to ensure files are submitted properly for proper orientation, we require files to be submitted HEAD TO HEAD.
We strongly encourage submitting 2 sided jobs as 1 file. For example, a 2 sided job should consist of 1 PDF, 2 pages.
We print using work and turn; therefore, files must be imposed properly to back up properly. Here is a following example of how files should be set up:
Greeting cards and other folded print products are different and should be set up as follows:
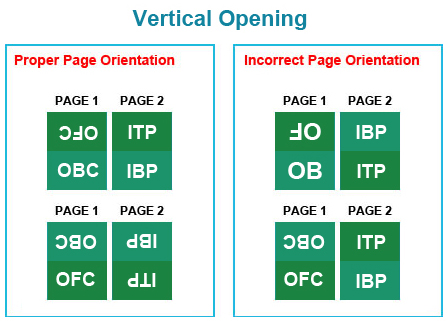
LEGEND: OFC - Outside Front Cover; OBC - Outside back cover; ITP - Inside Top Panel; IBP - Inside Bottom Panel (a.k.a Inside Cover)
LEGEND: OFC - Outside Front Cover; OBC - Outside back cover; ILP -Inside Left Panel (a.k.a Inside Front Cover); IRP - Inside Right Panel (a.k.a Inside Back Cover)
Very thin lines may not be visible once printed. The minimum thickness we recommend depends on the color values used. Generally, for lines that use 100% of one color only (C,M,Y, or K), we recommend a minimum thickness of 0.25pt. For multicolors, tints of color, or lines that are not 100% of one color, we recommend a minimum thickness of 0.5pt.
There could be many reasons why a file becomes corrupt. If your file is rejected by Prepress for being corrupt, here are some steps that may help solve the issue:
1. Resave your file under different settings.
2. Rename your file without special characters.
3. Reupload your file and ensure that the loading is complete.
4. Simplify the complex elements in your file.
5. Remove any hidden or unnecessary elements from your file.
6. Ensure fonts are properly embedded or outlined.
Save or Export In InDesign
- Choose File > Export.
- Specify a name and location for the file.
- For Save As Type (Windows) or Format (Mac OS), choose Adobe PDF (Print), and then click Save.
- Do one of the following:
- To use a predefined set of job options, choose a preset from the Adobe PDF Preset menu.
- To create a PDF/X file, either choose a PDF/X preset from the Adobe PDF Preset menu, or choose a predefined PDF/X format from the Standard menu.
- To customize options, select a category from the list on the left and then set the options.
- For Compatibility, choose the lowest PDF version necessary to open the files you create.
- Specify the following Accessibility Options under the Advanced tab, if necessary:
- Display Title: Choose what to display in the title bar of Acrobat when it opens your PDF. Available options are Document Title and File Name.
- Language: Choose the document language for the PDF. This determines the default language for the exported PDF. If the required language is not in the list, you can also type the standard language ISO code.
- Click Export (Windows) or Save (Mac OS).
Prepare Layers Before Exporting a Book to PDF
When you export a book to PDF, you can show and hide InDesign layers in the PDF document. To avoid duplication of layer names in the PDF, you can merge the layers on export.
If the Merge Identically Named Layers On Export option is selected, layer names appear under the same book name in Acrobat or Reader. If this option is not selected, layer names appear separately under each document name.
- If you don’t want certain layers to be merged, give them unique names in each book document. Layer names are case-sensitive, so “Art” and “art” layers are not merged.
- In the Book panel menu, select Merge Identically Named Layers On Export.
Export a Book to PDF
- Do one of the following:
- To create a PDF of the entire book, click in a blank area of the Book panel to deselect any selected documents, and choose Export Book To PDF in the Book panel menu.
- To create a PDF of documents within a book, select the document or documents in the Book panel, and choose Export Selected Documents To PDF in the Book panel menu.
- Specify a name and location for the PDF file, and then click Save.
- Either choose a preset from the Adobe PDF Preset menu, or select a category from the list on the left of the Export Adobe PDF dialog box, and then customize the options.
- Click Export (Windows) or Save (Mac OS).
Reduce PDF Size
For PDF files that are intended to be distributed for viewing purposes only, you may want to reduce the size of PDF files when you export from InDesign. Here are some of the size reduction techniques you can use in the Export Adobe PDF dialog box:
- Choose [Smallest File Size] from the Adobe PDF Preset menu.
- In the Compression area, downsample images to 72 pixels per inch, select automatic compression, and select either low- or medium-image quality for color and grayscale images. When you work with photographic images, use Automatic (JPEG) compression; when you work with images that are mostly solid color, such as charts and graphs, use ZIP compression.
- In the Output area, use the Ink Manager to convert spot colors to process colors.
Save in Illustrator PDF Format
Create an Adobe PDF
- Choose File > Save As or File > Save A Copy.
- Type a filename, and choose a location for the file.
- Choose Adobe PDF (*.PDF) as the file format, and click Save.
- Either choose a preset from the Adobe PDF Preset menu, or select a category from the list on the left of the dialog box and then customize the options.
- Click Save PDF.
Create a Multiple-Page Adobe PDF
Create multiple artboards in a document.
- Choose File > Save As, and select Adobe PDF for Save As Type.
- Do one of the following:
- To save all of the artboards to one PDF, select All.
- To save a subset of the artboards to one PDF, select Range, and type the range of artboards.
- Click Save, and set additional PDF options in the Save Adobe PDF dialog box.
- Click Save PDF.
Save in Photoshop PDF format
- Choose File > Save As, and then choose Photoshop PDF from the Format menu. You can select a Color option if you want to embed a color profile or use the profile specified with the Proof Setup command. You can also include layers, notes, spot color, or alpha channels. Click Save.
- In the Save Adobe PDF dialog box, choose an Adobe PDF preset specifying whether the Photoshop PDF file will be printed on a desktop printer or proofer, sent to a commercial printer, distributed by e-mail, displayed on the web, and so on. Choosing a preset is the easiest way to set options for your Photoshop PDF file.
- After you choose a preset, click Save PDF to generate your Photoshop PDF file. If you want to add security options or fine-tune the saving options for the PDF, follow the remaining steps in this procedure.
Please do not use any PMS colours in your file. The use of any PMS colours may result in an unwanted colour shift and other unexpected results. The only accepted colour mode is CMYK, with the exception of a spot white on white ink files.
For products such as business cards, we recommend avoiding the use of borders in designs. If the border is too close to the cutline, it may result in the final product being slightly off-centred. Movement of the cutter up to 1/16" inside or outside the trimline is inevitable. Border designs can be 'unforgiving' with regards to cutter movement and can make the movement of the cutter appear more pronounced.
Please sent a quote request.
Do not include any form field data, comments, or annotations in your PDF file.
There is a high likelihood that the data or text will not print on the finished product.
For most of our products, we require a high-resolution PDF file with bleed.
For variable products (e.g. numbered tickets) we require an Excel file and a dummy version of the artwork to show placement.
The file you upload must have fonts and images embedded or outlined in order to properly process your file.
Adobe InDesign: Window > Links
Choose the image you want to embed from the list and click on the arrow and select "Embed File".
Adobe Illustrator: Window > Links
Choose the image you want to embed from the list and click on the arrow and select "Embed Image".
Instruction on how to convert to outlines
Select your text box. Under the Type menu select Create Outlines.
Your files should always be in CMYK. Anything else may result in color shifts and other unexpected results when the other color modes are converted into CMYK.
For best results, the design file should be built in CMYK color mode in the native application.
Please do not include any other color modes such as RGB or PMS in your design.
Please note: While we make every effort to produce a reasonable representation based on materials supplied by the customer, we do not guarantee color matching. If color matching is crucial, we recommend placing a custom order.
To achieve a rich black for larger black coverage areas, we recommend the values C30 M20 Y20 K100. A black value of just K100 alone can sometimes appear as a darker grey and may not be as deep/rich compared to adding the supporting C30 M20 Y20 K100. A rich black also helps avoid potential overprint issues.
For smaller black type, we recommend one colour black at K100 to avoid potential registration issues.
Large Format Orders
For large format printing, we recommend using C80 M80 Y80 K100 for rich black values.
Vector images use mathematical equations to define each component of an image. This allows vector images to retain their high-quality at any size. Programs like Adobe Illustrator, Corel Draw, or Adobe Freehand uses vector graphics.
Vector images should be used for all text and logos if possible. They result in the clearest image and can be re-sized without losing resolution.
Raster images are composed of a collection of tiny dots called pixels. When these pixels are small, and placed close together, they fool the eye into forming a single image. Raster images work great when subtle gradations of colour are necessary. Because they contain a fixed number of pixels, a major disadvantage of raster images is that their quality suffers when they are enlarged or otherwise transformed.
Blues and purples have always been a problem in the printing industry because the two colors are so close together in the CMYK spectrum.
In order to ensure the two colors come up in the correct tones, leave at least a 15% difference in your Cyan and Magenta values.
For example: C100 M85 Y0 K0
For print to look blue, Cyan > Magenta by 15%
For print to look purple, Cyan < Magenta by 15%
Large Format Orders
For large format printing, we recommend leaving at least a 20-25% difference in your Cyan and Magenta values.
For example: C100 M75 Y0 K0
For print to look blue, Cyan > Magenta by 20-25%
For print to look purple, Cyan < Magenta by 20-25%
Please note: While we make every effort to produce a reasonable representation based on materials supplied by the customer, we do not guarantee color matching. If color matching is crucial, we recommend placing a custom order.
We are limited to a maximum ink coverage of 320%. Anything over may result in many print related problems such as cracking, offsetting, etc.
Please ensure your artwork does not exceed 320% ink coverage.
Red and orange are problematic on press because the two colors are close together in the CMYK spectrum.
In order to ensure the two colors come up in the correct tones, leave at least 15% difference in your Magenta and Yellow values.
For example: C0 M100 Y85 K0
For print to look red, Magenta > Yellow by 15%
For print to look Orange, Magenta < Yellow by 15%
Please note: While we make every effort to produce a reasonable representation based on materials supplied by the customer, we do not guarantee color matching. If color matching is crucial, we recommend placing a custom order.
Safe margins are 1/16" away from the cut line.
Safe margins are guidelines that help you keep important elements of your design away from the edge of your artwork so that text and images will not be cut off when trimmed down to the final size. This 1/16" accounts for the potential trimming variance. Anything outside of this safety area may get cut.
Transparency effects are generally not preferred in printing. It causes ripping issues and elements to disappear.
To prevent this, do not use any shadows, glows and transparencies on top of a spot colour and always convert your file to CMYK only before using any transparency effects.
A 1/8" bleed is required on all four sides of your artwork.
Bleed is extended artwork on all sides of the artwork to allow for cutter variance. Items such as background and design elements should always extend out of the trim margin.
Failing to provide full bleed and crop marks can result in the printed product showing a thin area of white on the edge.
If your file does not contain bleed, it may be rejected by our prepress department for a new file with bleed. This can result in delaying the completion of your job.
Overprinting refers to the process of printing one colour on top of another. If you do not want this to happen make sure that the overprint options are turned off and switched to knockout in your document.
Please note that our file preview does not display overprint issues. Therefore, it is critical to check your file for overprint issues before uploading the file to us.
We ask that all artwork files have a maximum file size of 250 megabytes.
This is to ensure that there are no delays in your turnaround due to file retrieval and processing time. If your file is larger than 250 megabytes, we recommend compressing and optimizing your file.
- Download our guides to ensure a more optimal print result.
- Be sure to DELETE any hidden layers that are not intended to print (ie: setup guide layers or other hidden artwork layers) to ensure no risk of them appearing on the final print.
- Each job (including multiple paged projects) must be submitted as a single PDF file. Ensure that all pages are the same size.
- Files must be submitted with proper orientation to ensure proper back up.
- It is best to try to avoid using borders in your design. If a border is too close to the trim, the trim may be slightly off-center.
- File must consist of 1/8" bleed and all important art and text must be within the safety margin.
- Ensure that your PDF is high res and that all images are CMYK at 300 DPI.
- Black type should have the following values: C0, M0, Y0, K100.
- Embed or outline all fonts.
- For best colour results, supply a CMYK only files.
All images should be submitted in their final print size at 300 DPI. Lower resolution images can cause the printed product to look blurry or pixelated.
If you are ordering double-sided signage with directional arrows on both sides of the sign, your file should be 2 pages with each arrow pointing in the opposite direction. This results in both arrows pointing in the correct direction once printed on the two sides of the sign.
How do I submit my files?
Files shoud be PDF - CMYK - 300 dpi.